
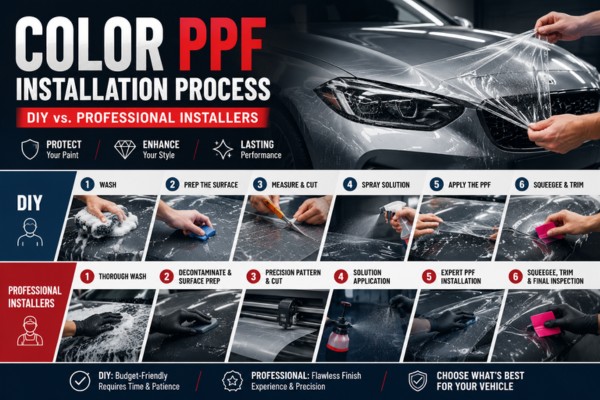
Color PPF Installation Process | DIY vs. Professional Installers
Whether you are protecting a brand-new vehicle or refreshing the look of an older one, color PPF (short for colored paint protection film) is one of the most exciting developments in automotive finishing. It combines the durability of traditional clear paint protection film with the aesthetic flexibility of a full wrap, giving your vehicle a bold new look while shielding the factory paint underneath. But getting the results right depends almost entirely on how well you execute the color PPF installation process. This guide covers everything you need to know, from understanding what color PPF is and why surface preparation matters more than any other step, to the tools you need, the actual application technique, and how to avoid the most common mistakes that ruin an otherwise flawless finish. Whether you are a weekend DIYer tackling your first hood or a professional installer looking to sharpen your workflow, this article walks you through the entire process with the depth and clarity the job demands. If you are looking for premium color PPF products and expert support, the team at SCAF USA is a trusted resource for both professional installers and serious enthusiasts. What Is Color PPF and Why Is It Different from Standard Clear Film? Color PPF is a thermoplastic urethane film that comes pre-tinted or pigmented in a wide range of colors and finishes, from deep metallics and matte blacks to vibrant satin blues and color-shift iridescents. Unlike standard clear PPF, which is nearly invisible once applied, color PPF serves a dual purpose: it protects your vehicle’s original paint from stone chips, road debris, UV degradation, and minor abrasions, while simultaneously acting as a full-color change solution. The core material is the same high-grade urethane used in traditional protection film, which means it carries the same self-healing properties when exposed to heat. Small surface scratches in the film will literally disappear after a few minutes in sunlight or after a light pass from a heat gun. This is a feature that standard vinyl wraps simply cannot offer, and it is one of the main reasons car owners are choosing color PPF over vinyl wraps when long-term protection is the priority. The thickness of color PPF typically ranges between 6 and 8 mils, making it substantially thicker than decorative vinyl. That extra mass is what absorbs the impact energy from road debris before it ever reaches your factory paint. For car owners who want both color and protection without committing to a permanent respray, color PPF has become the premium choice. The trade-off is cost and installation complexity. Color PPF is significantly more expensive per square foot than either vinyl wrap or clear PPF, and because the film is opaque, any installation errors such as bubbles, silvering, stretched panels, or lifted edges are immediately visible. That is why understanding and correctly executing the color PPF installation process is non-negotiable if you want results that look like a factory finish. Tools and Materials You Need Before Starting the Color PPF Installation Process Attempting to install color PPF without the right tools is one of the most reliable ways to ruin expensive film. The list below covers the essentials. Skimping on any of these will cost you more in wasted material than the tools themselves. Surface Preparation Tools You will need a clay bar kit or clay mitt, isopropyl alcohol (IPA) at 70 to 91 percent concentration, lint-free microfiber towels, a paint decontamination spray, and optionally a dual-action polisher with a light cutting compound if the paint has any surface swirls that could telegraph through the film. Installation Fluids The slip solution, sometimes called the install solution, is a diluted mixture typically made from baby shampoo and distilled water, or a dedicated PPF slip solution from manufacturers like GYEON, Flexfilm, or Avery Dennison. You will also need a tack solution (a much thinner mixture, sometimes nearly straight water) used when positioning edges and doing final placement. Sourcing professional-grade installation fluids through a supplier like SCAF USA ensures you are working with products specifically formulated for PPF adhesive chemistry. Application Tools A quality squeegee is indispensable. PPF installers almost universally prefer a felt-edge squeegee or a dedicated PPF squeegee, because hard plastic edges scratch or mark the film. You will also need a heat gun (not a hair dryer, since the temperature range is not sufficient), a sharp PPF knife or precision scalpel with fresh blades, cutting tape or low-tack masking tape for edge work, and a spray bottle for your slip solution. Positioning and Measurement Pre-cut patterns from a plotter make installation dramatically more accurate. Services like the DAP (Design Access Program) from Xpel, or pattern-cutting software for plotters like the Roland or Graphtec cutters, allow you to print exact templates for specific vehicle panels. If you are doing a custom cut by hand, a quality digital caliper and a soft tape measure help ensure panel symmetry. Safety and Environment Work in a clean, dust-free environment. A professional installation booth with filtered air is ideal, but if you are working in a garage, close all doors and windows, park on a clean floor, and avoid working when it is windy or dusty outside. Temperature matters greatly: the ideal installation temperature for color PPF is between 65 degrees F and 80 degrees F (18 to 27 degrees C). Film becomes too stiff to conform in cold conditions and too tacky and unforgiving in excessive heat. Surface Preparation: The Step That Determines Everything If there is one truth in the color PPF installation process, it is this: the quality of your surface preparation determines the quality of your final result. No amount of technique during application will compensate for contaminated, scratched, or improperly degreased paint. Washing and Decontamination Start with a thorough two-bucket hand wash using a pH-neutral car shampoo. Rinse completely, then dry the vehicle using a clean microfiber drying towel. After the initial wash, perform an iron decontamination by spraying the entire vehicle with an iron fallout
Color PPF Installation Process | DIY vs. Professional Installers Read More »