
Whether you are protecting a brand-new vehicle or refreshing the look of an older one, color PPF (short for colored paint protection film) is one of the most exciting developments in automotive finishing. It combines the durability of traditional clear paint protection film with the aesthetic flexibility of a full wrap, giving your vehicle a bold new look while shielding the factory paint underneath. But getting the results right depends almost entirely on how well you execute the color PPF installation process.
This guide covers everything you need to know, from understanding what color PPF is and why surface preparation matters more than any other step, to the tools you need, the actual application technique, and how to avoid the most common mistakes that ruin an otherwise flawless finish. Whether you are a weekend DIYer tackling your first hood or a professional installer looking to sharpen your workflow, this article walks you through the entire process with the depth and clarity the job demands.
If you are looking for premium color PPF products and expert support, the team at SCAF USA is a trusted resource for both professional installers and serious enthusiasts.
What Is Color PPF and Why Is It Different from Standard Clear Film?
Color PPF is a thermoplastic urethane film that comes pre-tinted or pigmented in a wide range of colors and finishes, from deep metallics and matte blacks to vibrant satin blues and color-shift iridescents. Unlike standard clear PPF, which is nearly invisible once applied, color PPF serves a dual purpose: it protects your vehicle’s original paint from stone chips, road debris, UV degradation, and minor abrasions, while simultaneously acting as a full-color change solution.
The core material is the same high-grade urethane used in traditional protection film, which means it carries the same self-healing properties when exposed to heat. Small surface scratches in the film will literally disappear after a few minutes in sunlight or after a light pass from a heat gun. This is a feature that standard vinyl wraps simply cannot offer, and it is one of the main reasons car owners are choosing color PPF over vinyl wraps when long-term protection is the priority.
The thickness of color PPF typically ranges between 6 and 8 mils, making it substantially thicker than decorative vinyl. That extra mass is what absorbs the impact energy from road debris before it ever reaches your factory paint. For car owners who want both color and protection without committing to a permanent respray, color PPF has become the premium choice.
The trade-off is cost and installation complexity. Color PPF is significantly more expensive per square foot than either vinyl wrap or clear PPF, and because the film is opaque, any installation errors such as bubbles, silvering, stretched panels, or lifted edges are immediately visible. That is why understanding and correctly executing the color PPF installation process is non-negotiable if you want results that look like a factory finish.
Tools and Materials You Need Before Starting the Color PPF Installation Process
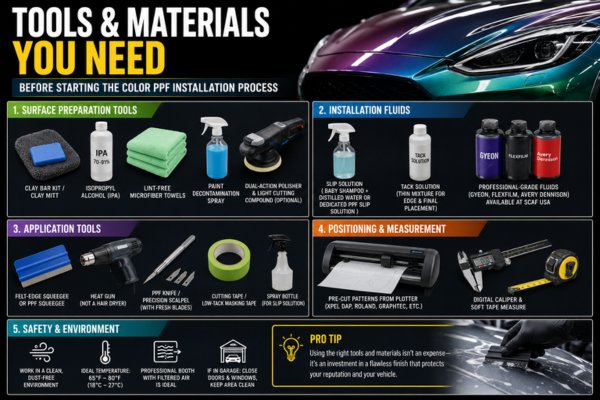
Attempting to install color PPF without the right tools is one of the most reliable ways to ruin expensive film. The list below covers the essentials. Skimping on any of these will cost you more in wasted material than the tools themselves.
Surface Preparation Tools
You will need a clay bar kit or clay mitt, isopropyl alcohol (IPA) at 70 to 91 percent concentration, lint-free microfiber towels, a paint decontamination spray, and optionally a dual-action polisher with a light cutting compound if the paint has any surface swirls that could telegraph through the film.
Installation Fluids
The slip solution, sometimes called the install solution, is a diluted mixture typically made from baby shampoo and distilled water, or a dedicated PPF slip solution from manufacturers like GYEON, Flexfilm, or Avery Dennison. You will also need a tack solution (a much thinner mixture, sometimes nearly straight water) used when positioning edges and doing final placement. Sourcing professional-grade installation fluids through a supplier like SCAF USA ensures you are working with products specifically formulated for PPF adhesive chemistry.
Application Tools
A quality squeegee is indispensable. PPF installers almost universally prefer a felt-edge squeegee or a dedicated PPF squeegee, because hard plastic edges scratch or mark the film. You will also need a heat gun (not a hair dryer, since the temperature range is not sufficient), a sharp PPF knife or precision scalpel with fresh blades, cutting tape or low-tack masking tape for edge work, and a spray bottle for your slip solution.
Positioning and Measurement
Pre-cut patterns from a plotter make installation dramatically more accurate. Services like the DAP (Design Access Program) from Xpel, or pattern-cutting software for plotters like the Roland or Graphtec cutters, allow you to print exact templates for specific vehicle panels. If you are doing a custom cut by hand, a quality digital caliper and a soft tape measure help ensure panel symmetry.
Safety and Environment
Work in a clean, dust-free environment. A professional installation booth with filtered air is ideal, but if you are working in a garage, close all doors and windows, park on a clean floor, and avoid working when it is windy or dusty outside. Temperature matters greatly: the ideal installation temperature for color PPF is between 65 degrees F and 80 degrees F (18 to 27 degrees C). Film becomes too stiff to conform in cold conditions and too tacky and unforgiving in excessive heat.
Surface Preparation: The Step That Determines Everything
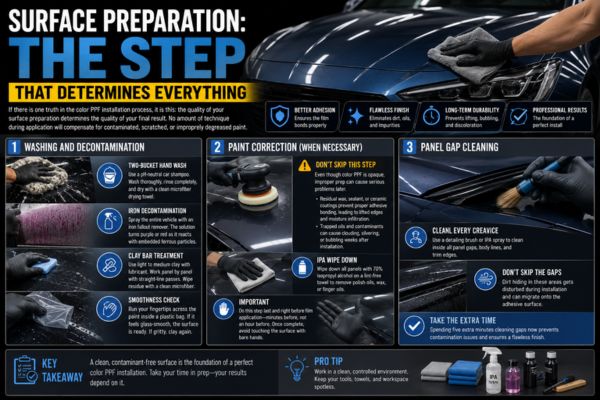
If there is one truth in the color PPF installation process, it is this: the quality of your surface preparation determines the quality of your final result. No amount of technique during application will compensate for contaminated, scratched, or improperly degreased paint.
Washing and Decontamination
Start with a thorough two-bucket hand wash using a pH-neutral car shampoo. Rinse completely, then dry the vehicle using a clean microfiber drying towel. After the initial wash, perform an iron decontamination by spraying the entire vehicle with an iron fallout remover. You will see the solution turn purple or red as it reacts with embedded ferrous particles, a clear sign that those contaminants are being dissolved before they get trapped under the film.
Follow the iron decontamination with a clay bar treatment. Use light to medium clay with a fresh lubricant, and work panel by panel using straight-line passes. After claying each section, wipe away the lubricant residue with a clean microfiber. Run your fingertips across the paint inside a plastic sandwich bag. If it feels glass-smooth, the surface is ready. If it still feels gritty, clay again.
Paint Correction (When Necessary)
Because color PPF is opaque, you might assume paint correction is unnecessary. That assumption is wrong in two important ways. First, if any wax, sealant, or ceramic coating residue remains on the paint, the PPF adhesive will not bond properly, leading to lifted edges and moisture infiltration over time. Second, even though you cannot see scratches through the film, oils and contaminants trapped between the film and paint can cause clouding, silvering, or bubbling weeks after installation.
Wipe down all panels with 70 percent isopropyl alcohol on a lint-free towel immediately before film application. This removes any residual polish oils, wax, or finger oils introduced during the prep process. Do this step last, and do it right before laying film, not an hour before, but minutes before. Once you have completed this step, stop touching the paint surface with bare hands.
Panel Gap Cleaning
Use a detailing brush or a nozzle on your IPA spray bottle to saturate and clean inside all panel gaps, body lines, and trim edges. Dirt hiding in these crevices gets disturbed during film installation and migrates onto the adhesive surface. Taking five extra minutes to blow out or wipe down gaps before you start laying film prevents contamination problems later.
The Color PPF Installation Process: Step-by-Step Application
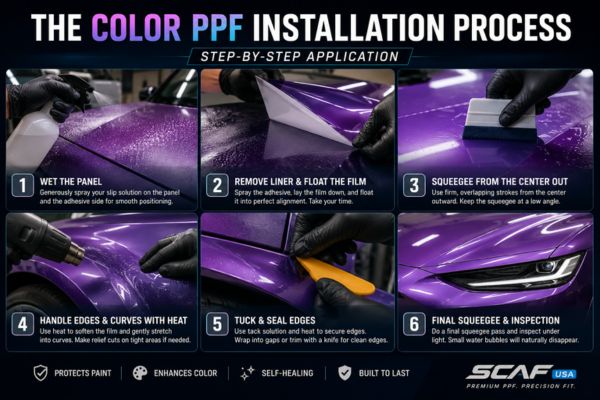
With your surface fully prepped and your tools ready, you are now set to begin the core of the color PPF installation process. The steps below apply to pre-cut panels delivered from a plotting service, which is the method most professional and serious DIY installers use. You can explore professional-grade pre-cut film options at SCAF USA to find patterns compatible with your specific vehicle.
Step 1: Wet the Panel
Generously spray your slip solution across the entire panel you are working on. The film liner adhesive and the wet paint surface should both be well saturated. The slip solution allows you to float the film into position without it locking to the paint prematurely. Work quickly but methodically. You want the surface wet throughout the entire positioning phase.
Step 2: Remove the Liner and Float the Film
Peel back a portion of the liner from the film, keeping the adhesive side facing down. Spray the exposed adhesive with slip solution before it contacts the panel, then lay it down and spray more solution on top of the exposed film backing. This gives you a working surface you can slide into final alignment.
Do not rush this step. Take your time floating the film until all edges align correctly with the panel borders, trim lines, and body gaps. Most pre-cut patterns have a built-in margin to tuck into panel gaps. Align those edges first, because they are your fixed reference points.
Step 3: Squeegee from the Center Out
Once the film is positioned, begin squeegeeing from the center of the panel outward toward the edges. Use overlapping, firm strokes with your felt-edge squeegee, pressing firmly enough to push the slip solution out from under the film without stretching or distorting the material. Keep the squeegee at a low angle, roughly 30 to 45 degrees, to maximize the area of contact per stroke.
Avoid pressing so hard that you leave squeegee marks or scuff the film surface. If the film is dragging rather than gliding under the squeegee, add more slip solution. The film should feel like it is sliding smoothly on a thin water film, not grinding against a dry surface.
Step 4: Handle Edges and Curves with Heat
Body curves, bumpers, fenders, and any panel with a compound curve require heat to conform without fingering, which is the accordion-like wrinkling at the film edge on tight bends. Use your heat gun on a medium setting and apply heat in short passes. Never hold the gun in one place. As the film warms, it becomes more pliable and will conform to the curve when gently stretched and pressed into place.
Work the edges with your thumb or the flat face of a squeegee after heating, pressing the film firmly into body lines and around curves. On extremely tight radii like bumper edges or side mirror corners, you may need to make small relief cuts with your precision knife to eliminate bridging and allow the film to lie flat without tension.
Step 5: Tuck and Seal Edges
For any edge that can be wrapped under or into a panel gap, apply tack solution (very low soap concentration, near-straight water) rather than slip solution. The tack solution accelerates adhesion and is ideal for final edge work. Heat the edge, stretch the film gently around the gap or bodywork edge, and press firmly. Work in small sections: heat a 4-inch section, press, move to the next section.
Clean edges that cannot be wrapped should be finished with a sharp knife and cutting tape. Apply a strip of low-tack cutting tape along the edge line, slice through the film cleanly in one pass with a fresh blade, then peel away the tape and excess film. Press the cut edge down immediately with a firm squeegee pass.
Step 6: Final Squeegee and Inspection
Once all edges are secured, do a final squeegee pass across the entire panel to push out any remaining moisture. Check the panel from multiple angles under direct light to identify any bubbles, lifted edges, or contaminant spots that need addressing before the adhesive sets fully.
Small water bubbles are normal immediately after installation and will evaporate through the film within 24 to 72 hours in warm conditions. However, large white bubbles or silver-looking areas that appear dry rather than wet indicate improper adhesion and will need to be lifted and reapplied before the film cures completely.
Dealing with Common Color PPF Installation Problems

Learn how to identify and fix common color PPF installation issues including silvering, edge lifting, fingering on curves, and dirt contamination.
Even experienced installers encounter installation challenges from time to time. Knowing how to diagnose and address problems quickly, before the film fully cures, is a skill that separates competent installers from great ones.
Silvering and Haze
Silvering looks like a frosted or hazy white area beneath the film and is almost always caused by adhesive that has not properly contacted the paint surface. It typically appears near edges or over any area where contamination was present on the paint. The fix is to lift the affected section while the film is still workable (within the first hour or two of application), re-clean the surface, and re-apply with fresh slip solution. Using a high-quality film with a proven adhesive formula, such as the products available through SCAF USA, significantly reduces the likelihood of silvering when the surface is properly prepared.
Edge Lifting
Lifted edges occur when the film has not been properly pressed and adhered at the perimeter, or when wax or coating residue prevented proper bonding. If you catch lifting within the first few days, you can often re-heat the edge with a heat gun and press it back down firmly. After full cure (typically 7 to 14 days), re-adhesion becomes much harder without fully lifting and repositioning the panel.
Fingering on Curves
Fingering, the small wrinkles or accordion folds that form at stretched edges, is the most visible sign of an unskilled installation on curved panels. It is caused by insufficient heat, stretching the film too aggressively, or trying to wrap too large a section at once. The remedy is patience: heat a small section, press it down, heat the next 3 to 4 inches, press, and repeat. Never try to stretch and conform a large curved section in a single motion.
Dirt Contamination
If you see small bumps beneath the film after application, that is typically dust or debris that settled on the adhesive or paint between prep and installation. Prevention is the best approach here. Work fast, keep your installation area clean, and always do a final IPA wipe immediately before laying film. If a piece of debris is trapped, you may be able to gently lift the corner of the film before it cures, remove the particle with a piece of tape, and re-apply.
Curing, Aftercare, and Long-Term Maintenance
The color PPF installation process does not end when you put your squeegee down. Proper curing and aftercare are what determine how long the film performs and how good it continues to look.
The Curing Period
After installation, keep the vehicle out of rain and car washes for a minimum of 48 to 72 hours. If possible, park in a warm, dry environment. Full adhesive cure typically takes 7 to 14 days depending on ambient temperature and humidity. During this period, avoid pressure washers or automated car wash brushes entirely.
You may notice water spots, light haze, or small water bubbles during the curing period. This is normal and expected. As long as the edges are properly adhered, these cosmetic issues will resolve on their own as the moisture trapped during installation migrates through the film.
Washing After Cure
After full cure, you can wash the vehicle normally. Use a pH-neutral car shampoo and a soft microfiber wash mitt. Avoid petroleum-based cleaning products, solvent-based dressings, or anything with strong detergents, as these can attack the film top coat and degrade both the finish and the self-healing layer over time.
For areas like lower bumpers and rocker panels that collect road grime, a dedicated PPF maintenance spray keeps the surface clean without compromising the film. If your specific color PPF product is compatible with ceramic coatings (and most are), applying a film-safe ceramic coating after full cure adds an additional layer of hydrophobic protection and makes ongoing maintenance significantly easier. The SCAF USA product catalog includes film-compatible care products worth exploring for long-term maintenance.
Protecting the Film Finish Long-Term
Color PPF in matte or satin finishes requires slightly different maintenance than gloss finishes. Avoid polish, wax, or any product designed to add shine on matte or satin film, as they will fill the micro-texture of the finish and create unwanted gloss spots. Use a product specifically labeled as safe for matte or satin finishes.
For gloss color PPF, a light application of a paint sealant or spray wax after each wash will help maintain the depth of color and make the film easier to clean. Avoid any abrasive polishes, which can dull or haze the film surface over time.
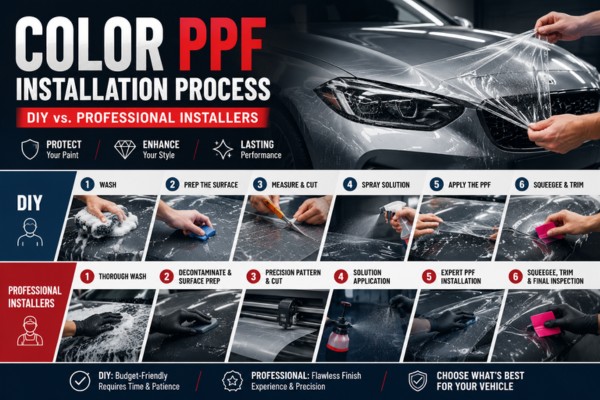
When to Choose Professional Installation vs. DIY

Compare the benefits of professional and DIY color PPF installation to choose the best option for your vehicle and skill level.
The color PPF installation process is genuinely learnable. Many enthusiasts successfully complete full vehicle installations at home after some practice on smaller panels. However, there are real situations where professional installation is the smarter financial and aesthetic choice.
If you are installing color PPF on a new or high-value vehicle, the cost of a professional installation is almost always justified. A single botched panel on a luxury vehicle often requires purchasing a new sheet of film, paying for a professional to remove and reapply, and potentially dealing with paint damage if aggressive solvents were used in removal. The potential downside dramatically outweighs the cost savings of DIY.
If you are working on your second or third vehicle, have completed practice panels successfully, and are comfortable with your tools and installation environment, a DIY installation on mid-tier panels like hoods, door edges, and rocker panels is very achievable. Start with flat, accessible panels and work your way up to complex curved sections as your skills develop.
Professional installers who specialize in color PPF bring not only installation skill but also access to pattern libraries, professional cutting plotters, climate-controlled booths, and the experience to handle vehicle-specific challenges that catch DIYers off guard. Whether you are a professional installer looking to stock high-performance film or a DIY enthusiast sourcing premium materials, SCAF USA provides the products and expertise to support your project at every stage.
Frequently Asked Questions About the Color PPF Installation Process
How long does the color PPF installation process typically take?
A single panel like a hood or bumper takes an experienced installer roughly 30 to 60 minutes from surface prep to final squeegee. A full vehicle installation including all painted panels typically takes a professional team 2 to 4 days, depending on the vehicle complexity and the number of panels. For a DIY installer working alone, expect to spend considerably more time on each panel as you develop your technique.
Can color PPF be removed without damaging the factory paint?
Yes, when installed correctly and removed properly, color PPF should come off without damaging the original paint. The key is using heat during removal to soften the adhesive and peeling the film back at a shallow angle rather than pulling it straight up. Any adhesive residue left behind can be dissolved with an IPA wipe or a dedicated adhesive remover. Paint damage during removal is typically caused by improper removal technique or film that has been on the vehicle for an extremely long time under harsh conditions.
Does color PPF require the same prep as clear PPF?
Yes, and in some respects it requires even more careful preparation. Because color PPF is opaque, any contamination trapped under the film can cause visible silvering or haze beneath the solid color, which tends to be more aesthetically disruptive than under clear film. The surface preparation steps, including iron decontamination, clay bar treatment, and IPA wipe, are identical and equally critical for both film types.
Can I install color PPF over an existing wrap or coating?
Installing color PPF over an existing vinyl wrap is not recommended, as the wrap surface texture and adhesive layer create an unstable base that leads to premature lifting. Installing over a ceramic coating requires careful evaluation, because some ceramic coatings are slick enough to prevent proper adhesion while others are compatible with PPF. Check with your film supplier, such as the team at SCAF USA, for compatibility guidance before applying film over a coated surface.
How long does color PPF typically last?
Most premium color PPF products carry manufacturer warranties between 5 and 10 years, with real-world lifespans often exceeding that in temperate climates with proper maintenance. UV exposure, harsh chemicals, and physical abrasion are the primary factors that degrade film over time. A professionally installed film with proper aftercare will typically outlast a DIY installation simply because the adhesion and edge sealing tend to be more consistent.
What is the difference between color PPF and a vinyl color wrap?
The primary differences are thickness, self-healing capability, and impact protection. Vinyl wrap is a thin decorative film, typically 2 to 4 mils, designed purely for aesthetics with no meaningful impact resistance. Color PPF is a 6 to 8 mil thermoplastic urethane film engineered to absorb and deflect physical impact while also providing the color change. Color PPF also self-heals light surface scratches, while vinyl wrap does not. The cost reflects these differences, with color PPF typically running two to four times the cost of vinyl for the same coverage area.
Conclusion: Mastering the Color PPF Installation Process
The installation process rewards preparation, patience, and attention to detail. Every step, from thorough paint decontamination to the final edge tuck, contributes to a result that either looks flawless or reveals shortcuts. Unlike clear film, color film does not easily hide mistakes.
Whether you are taking the DIY route or trusting a professional, knowing what the process involves makes you a smarter buyer and a more capable installer. You understand why the prep matters, why the right slip solution makes edge work easier, why heat is your friend on curves, and why curing conditions affect the long-term performance of the film.
If you are ready to take the next step, explore the full range of color PPF installation process products, pre-cut patterns, and installation accessories at SCAF USA. Their catalog supports both professional shops and serious DIY installers with premium film options and knowledgeable customer support. Visit scafusa.com today to browse products, request a quote, or get expert guidance on the right film for your vehicle and goals.